Manually correct letter spacing: Kerning

From time to time it is necessary to manually correct the spacing between two letters, i.e. to add some extra kerning. The macro to add this kind of horizontal space is \kern followed by the amount of spacing Since it is a TeX primitive the “argument” must not be in braces and the trailing space is optional.

Example

The following image shows the result: The upper line uses the natural kerning with too much space between letters W and o and the lower line shows the manually correction.
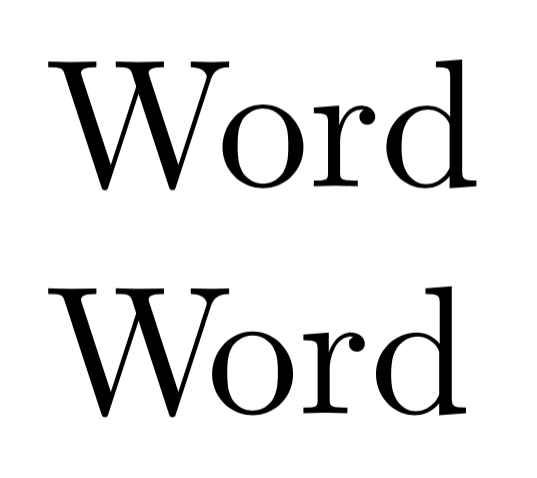
Example of extra kerning between the letters W and o

It is suitable to use a font-size-relative length unit like em.


Of course this would be lot of work to do but it is a good idea to at least do it for titles, headlines and such. Furthermore there are typefaces/fonts requiring more corrections than others …

Define new macros for logical markup

When you encounter some logical markup, i.e. some things that belong to the same “class” and should be displayed equally (like names etc.), don’t use \textit and the like to format them but instead define a new macro to format those things. Then you’ll be consistent and you can change things later on quite easy.

Example
In your text there are lots of names, that should be – at the moment – displayed in italics. Then define a macro \person (or what ever you consider a meaningful name for these things) to format the output:

This gives you the opportunity to change the styling later and even do some fancy stuff like highlighting only the first occurrence of a name or generating an index with those names etc.

Some will say: “But I can just search and replace \textit later.” Yes but not if you used it also to format book titles or other things that should keep the italic format ;-)

Don’t use short cut macros

Today I took over a client’s project containing lots of definitions like

etc. Don’t do this! It’s absolutely awful to maintain and in some month when you get back on your document you’ll probably have forgotten what all those shortcuts mean. On a first sight they save some time while typing but that is actually a task for autocompletion and a proper editor. Furthermore things probably get complicated if you redefine (\renewcommand) macros that are already defined without knowing what you do and which other packages rely on the original definition …

It gets even worse if you share your documents with someone else and force them to learn you abbreviations, while e.g. \beta is perfectly clear for everyone. Not to think about a case where two authors use different definitions/abbreviations like

Thus: Don’t use shortcuts instead of the original macros and use “speaking” (meaningful) names for your macros.

Post updated according to Clemens’ and Moss’ comments.

Order of float placement parameters

Did you know that the order of the float placement specifiers h, t, b and p, like in

has absolutely no effect? Thus [hb] is exactly the same as [bh]: both allow the float only to be placed “here” or at the bottom but not the top of a page nor on a float page.

The order of possible positions is hard-coded in the algorithm: 1. here, 2. top of this page, 3. bottom of this page, 4. float page, 5. top of next page and finally 6. bottom of next page.

texlive

Get TeX Live 2016 now

The 2016 version of TeX Live (and MacTeX for Mac OS X users) is now available for download at tug.org/texlive (or tug.org/mactex in case of OS X). You can install TL 2016 beside older versions harmlessly and optionally delete the old version(s) afterwards to save some disk space.

Happy TeXing!

PS: Members of TUG and/or dante (and probably other TeX user groups) will receive a copy on DVD. So join the one of them 😉

TeXstudio 2.11.0 was released

There’s a new version of TeXstudio available at http://texstudio.sourceforge.net. Here are some of the many changes:

  • support two editors next to each other
  • new tabular wizard
  • improve table manipulation of tabu/longtabu
  • do not remove cursor mirrors on undo
  • several updates to col files

Use rotating.sty for wide tables/figures

You can use the rotating package to automatically rotate wide figures or tables. It provides {sidewaystable}/{sidewaysfigure} as a alternatives for {table}/{figure} and rotates the environment content by 90°. The direction of the rotation can be set with package options clockwise or counterclockwise; if you set twoside as class or package option the tables/figures are rotated by extra 180° on odd pages.

PS: Use booktabs for a nicer styling of your tables 😉